Geotagging
UgCS allows tagging images taken by the drone with coordinates from recorded telemetry. Important note, remember the difference between the camera clock and the clock on the computer that recorded the telemetry.
HINT: the easiest way to remember the time difference is to take a picture of a computer's clock with the drone camera. Then compare the time on the image with the “modified” attribute of the picture. Hovering the mouse over the clock placed in the top right corner of UgCS will provide a hint with the current time detailed up to milliseconds.

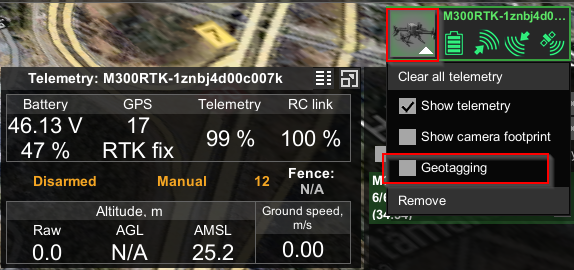
The geotagging tool is available from the context menu of vehicles in the Telemetry Player.
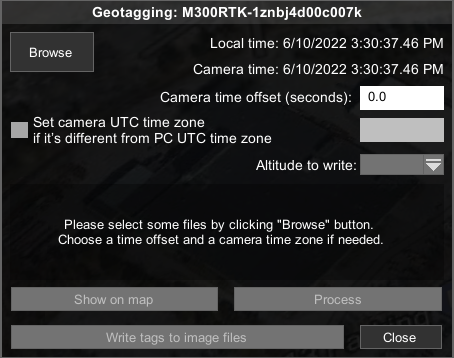
After pressing “Geotagging” the following window is being displayed.

Click “Browse” to select images. Only JPEG is supported.
A number of images will be shown, time from the first and last image as start and end time.
The process of geotagging is straightforward. Choose an image and try to find the closest telemetry record in the database. For the search to be as precise as possible it is important to know the camera time offset – the difference between the camera clock and the computer (where telemetry was initially recorded) clock.
If data were processed on a computer with a clock configured for another UTC time zone than the camera time zone, the checkbox “Set camera UTC time zone if it’s different from PC UTC time zone” needs to be set and the camera's UTC time zone specified.
After everything is configured, press “Process”. The algorithm will try to find coordinates for the pictures.
After processing is complete, the button “Show on a map” will display the camera position for each picture taken.
If everything is correct, select altitude type from the dropdown list - AMSL, AGL, RAW, or None and press “Write tags to image files” to save coordinates and selected altitude as EXIF tags into pictures.
Updated almost 2 years ago
